VPS に CentOS 7.0 でWebサーバー構築・公開(Apache、CloudCore編)
実現する機能
Webサーバー(Apache)はInternet Explorer等のブラウザから自宅サーバーのWebページをみれるようにするためのサーバーです。
Webサーバーの導入手順
(1)Apacheとphpのインストール(phpで作成されたWordPressを自サイトで使用しているため)
[root@ufuso ~]# yum -y install httpd ← Apacheのインストール インストール: httpd.x86_64 0:2.4.6-17.el7.centos.1 依存性関連をインストールしました: httpd-tools.x86_64 0:2.4.6-17.el7.centos.1 mailcap.noarch 0:2.1.41-2.el7 完了しました! [root@ufuso ~]# yum -y install php php-mbstring php-pear ← phpのインストール インストール: php.x86_64 0:5.4.16-21.el7 php-mbstring.x86_64 0:5.4.16-21.el7 php-pear.noarch 1:1.9.4-21.el7 依存性関連をインストールしました: libzip.x86_64 0:0.10.1-8.el7 php-cli.x86_64 0:5.4.16-21.el7 php-common.x86_64 0:5.4.16-21.el7 php-process.x86_64 0:5.4.16-21.el7 php-xml.x86_64 0:5.4.16-21.el7 完了しました! |
(2)Webサーバー設定
[root@ufuso ~]# vi /etc/httpd/conf/httpd.conf ← httpd設定ファイル編集

ServerAdmin webmaster@ufuso.org ← エラーページ等に表示される管理者メール
アドレスを指定(ufuso.orgは例示)

ServerName ufuso.org:80 ← #を削除してサーバー名を指定(ufuso.orgは例示)

<Directory "/var/www/html">

#
# Possible values for the Options directive are "None", "All",
# or any combination of:
#   Indexes Includes FollowSymLinks SymLinksifOwnerMatch ExecCGI MultiViews
#
# Note that "MultiViews" must be named *explicitly* --- "Options All"
# doesn't give it to you.
#
# The Options directive is both complicated and important.  Please see
# http://httpd.apache.org/docs-2.0/mod/core.html#options
# for more information.
#
    Options Includes ExecCGI FollowSymLinks ← Indexesを削除してファイルの一覧
表示を防ぎ、Includes ExecCGIを追記してCGI,SSIを許可

#
# AllowOverride controls what directives may be placed in .htaccess files.
# It can be "All", "None", or any combination of the keywords:
#   Options FileInfo AuthConfig Limit
#
    AllowOverride  All ← Noneを Allに変えて、.htaccessの許可

#
# The following directives define some format nicknames for use with
# a CustomLog directive (see below).
#
LogFormat "%h %l %u %t "%!414r" %>s %b "%{Referer}i" "%{User-Agent}i"" combined
 ← 長すぎるURI(414エラー)はログに記録しない

    #
    # If you prefer a logfile with access, agent, and referer information
    # (Combined Logfile Format) you can use the following directive.
    #

SetEnvIf Request_URI "default.ida" no_log ← wormからのアクセスをログに記録せず
SetEnvIf Request_URI "cmd.exe" no_log ← wormからのアクセスをログに記録せず
SetEnvIf Request_URI "root.exe" no_log ← wormからのアクセスをログに記録せず
SetEnvIf Request_URI "Admin.dll" no_log ← wormからのアクセスをログに記録せず
SetEnvIf Request_URI "NULL.IDA" no_log ← wormからのアクセスをログに記録せず
SetEnvIf Remote_Addr 192.168.1 no_log ← 内部からのアクセスをログに記録せず
SetEnvIf Remote_Addr 127.0.0.1 no_log ← 自ホストからのアクセスをログに記録せず
CustomLog logs/access_log combined env=!no_log ← 上記以外のアクセスをログに記録
する

AddHandler cgi-script .cgi .pl ← 行頭の#を削除して有効にし、CGIスクリプトに.pl
を追加

#AddDefaultCharset UTF-8 ← 行頭に#を付けて、無効にする

ServerTokens Prod ← 最終行に追記。OSをProdに変えてエラーページ等でOS名を表示
しないようにする

KeepAlive On ← 最終行に追記。OffをOnに変えて接続が切れていないか定期的にチェッ
クする
|
(3)Perlコマンドへ/usr/local/bin/perlでもアクセスできるようにする
[root@ufuso ~]# ln -s /usr/bin/perl /usr/local/bin/perl ← /usr/local/bin/perlから/usr/bin/perlへリンクをはる [root@ufuso ~]# whereis perl ← Perlのパスを確認 perl: /usr/bin/perl /usr/local/bin/perl /usr/share/man/man1/perl.1.gz ← Perlのパスに/usr/local/bin/perlが表示されることを確認 [root@ufuso ~]# chown -R tu:apache /var/www/html ← rootから所有者を自分に:グ ループをapacheに変更(tuは例示) |
(4)Webサーバー起動
[root@ufuso ~]# systemctl start httpd ← httpd起動 [root@centos ~]# systemctl enable httpd ← httpd自動起動設定 ln -s '/usr/lib/systemd/system/httpd.service' '/etc/systemd/system/multi-user.target.wants/httpd.service' |
(5)ポート80番のOPENを確認
ポートチェック【外部からポート開放確認】で「host名」にサーバー名(例:ufuso.org)、「port番号」に80と入力して「ポートチェック」ボタン押下し、「ホスト=ufuso.org ポート=80 にアクセスできました。」と表示されることを確認。
(6)外部からのWebサーバーアクセス確認
外部からWebサーバーにアクセスできるか確認する。
[root@ufuso ~]# echo test >> /var/www/html/index.html ← テストページ作成 |
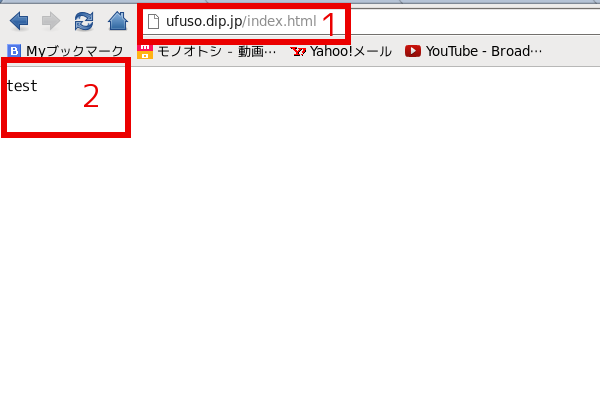
(7)firefox等のブラウザの赤枠1にサイトのURLを入力して、赤枠2の「test」が表示されればOK(下図は例示)。

[root@ufuso ~]# rm -f /var/www/html/index.html ← テストページの削除 |
通信の暗号化
(1)サーバー用秘密鍵・証明書作成
[root@ufuso ~]# cd /etc/pki/tls/certs/ ← ディレクトリ移動 [root@ufuso certs]# sed -i 's/365/3650/g' Makefile ← サーバー用証明書有効期限を1年から 10年に変更 [root@ufuso certs]# make server.key ← サーバー用秘密鍵の作成 umask 77 ; \ /usr/bin/openssl genrsa -aes128 2048 > server.key Generating RSA private key, 2048 bit long modulus .....................................................................+++ .+++ e is 65537 (0x10001) Enter pass phrase:← パスワードの作成入力(忘れないこと) Verifying - Enter pass phrase:← パスワードの作成再入力 [root@ufuso certs]# openssl rsa -in server.key -out server.key ← サーバー用 秘密鍵からパスワード削除 Enter pass phrase for server.key: ← 上記で応答したパスワードを入力(非表示) writing RSA key [root@ufuso certs]# make server.crt ← サーバー用秘密鍵の作成 umask 77 ; \ /usr/bin/openssl req -utf8 -new -key server.key -x509 -days 3650 -out server.crt -set_serial 0 You are about to be asked to enter information that will be incorporated into your certificate request. What you are about to enter is what is called a Distinguished Name or a DN. There are quite a few fields but you can leave some blank For some fields there will be a default value, If you enter '.', the field will be left blank. ----- Country Name (2 letter code) [XX]:JP ← 国名応答 State or Province Name (full name) []:Okinawa ← 都道府県名応答 Locality Name (eg, city) [Default City]:Naha ← 市区町村名応答 Organization Name (eg, company) [Default Company Ltd]:ShikakiraCS ← 組織名が無ければドメイン名でも入力 Organizational Unit Name (eg, section) []: ← 空のままエンター・キーを押す Common Name (eg, your name or your server's hostname) []:ufuso.org ← ホストネーム=ドメイン名 Email Address []:webmaster@ufuso.org ← 管理者のメルアド [root@ufuso certs]# chmod 400 server.* ← アクセス不可設定 |
※パスワードを削除するのは、Webサーバー起動時にパスワードを要求されないようにするため
(2)Webサーバー(httpd)の設定
[root@ufuso ~]# yum -y install mod_ssl ← mod_sslインストール インストール: mod_ssl.x86_64 1:2.4.6-17.el7.centos.1 完了しました! [root@ufuso certs]# vi /etc/httpd/conf.d/ssl.conf ← ApacheSSL設定ファイル編集 # General setup for the virtual host, inherited from global configuration DocumentRoot "/var/www/html" ← #を削除(コメント解除) ServerName ufuso.org:443 ← #を削除(コメント解除)してホスト名を入力 # Server Certificate: # Point SSLCertificateFile at a PEM encoded certificate. If # the certificate is encrypted, then you will be prompted for a # pass phrase. Note that a kill -HUP will prompt again. A new # certificate can be generated using the genkey(1) command. #SSLCertificateFile /etc/pki/tls/certs/localhost.crt ← #を付けて SSLCertificateFile /etc/pki/tls/certs/server.crt← サーバー用証明書を指定 # Server Private Key: # If the key is not combined with the certificate, use this # directive to point at the key file. Keep in mind that if # you've both a RSA and a DSA private key you can configure # both in parallel (to also allow the use of DSA ciphers, etc.) #SSLCertificateKeyFile /etc/pki/tls/private/localhost.key ← #を付けて SSLCertificateKeyFile /etc/pki/tls/certs/server.key ← サーバー用秘密鍵を指定 |
(3)Apache設定反映
[root@ufuso certs]# systemctl restart httpd ← Apache再起動 |
(4)ポート443番のOPENを確認
ポートチェック【外部からポート開放確認】で「host名」にサーバー名(例:ufuso.dip.jp)、「port番号」に443と入力して「ポートチェック」ボタン押下し、「ホスト=ufuso.dip.jp ポート=443 にアクセスできました。」と表示されることを確認。
(3)Apache設定反映
[root@ufuso certs]# firewall-cmd --add-service=https --zone=public --permanent ← Apache再起動 success [root@ufuso certs]# firewall-cmd --reload ← Apache再起動 success |
(5)WebサーバーSSL確認
自サイト(例示ではhttps://ufuso.dip.jp/)にアクセスして「セキュリティの警告」ウィンドウが表示されるので、赤枠をクリックしてWebページが表示されればOK(画面はWindowsXPの場合)
